knative入门
什么是knative
knative 是一个基于 Kubernetes 的 serverless 框架,其主要目标是在基于Kubernetes之上为整个开发生命周期提供帮助. 不仅可以部署和伸缩应用程序,还可以构建和打包应用程序. Knative 使开发者能够专注于编写代码,而无需担心构建、部署和管理应用等“单调而棘手”的工作。
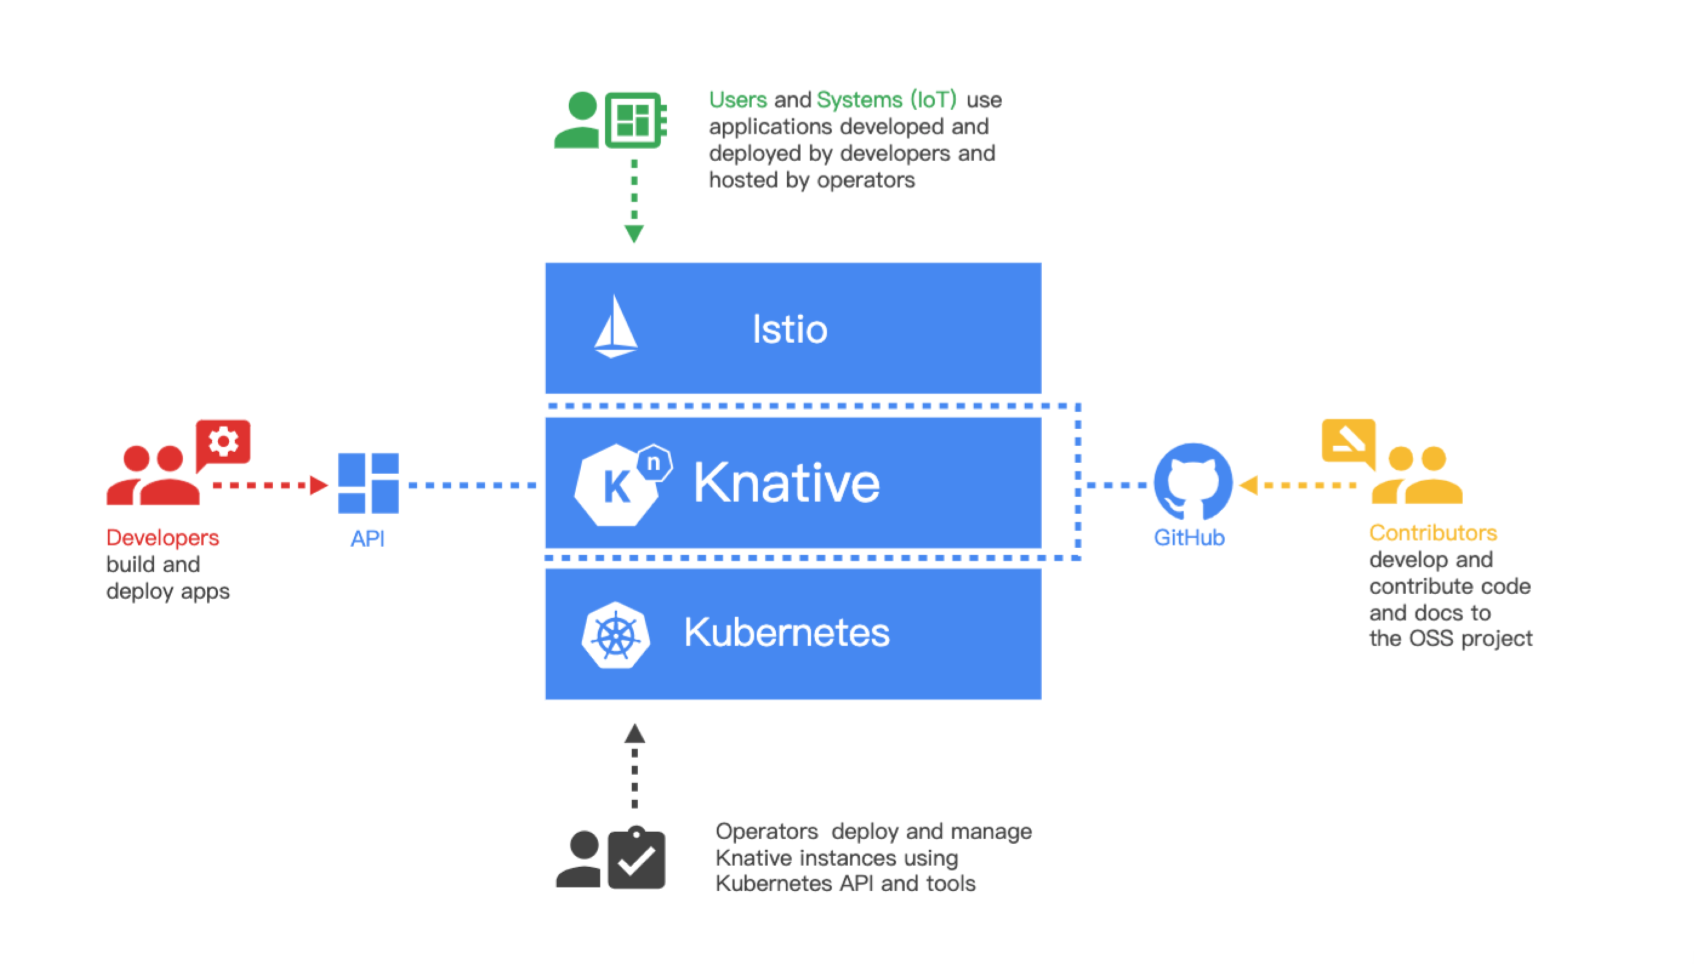
如下图所示, knative是建立在 kubernetes和 isto平台之上的,使用 kubernetes提供的容器管理能力( deployment、 replicase 和 pods等),以及 isto提供的网络管理功能( Ingress、LB、 dynamic route等)。
何为serverless
serverless 中文可以翻译为无服务器架构, 有两个方面的定义:
狭义讲就是你的服务是很少的一段代码或者是一个函数,这个代码或者函数可以通过事件(一个http请求或者消息队列的消息)来触发,总结下来就是 Trigger + FAAS + BAAS(高可用免运维的后端服务);
广义上来讲serverless是简化运维的一种方案,即服务免运维,可实现 CI/CD,自动扩缩容,灰度等自动化操作;
knative 就是属于广义上定义的serverless, 它构建在 Kubernetes 的基础上,并为构建和部署无服务器架构(serverless)和基于事件驱动的应用程序提供了一致的标准模式。Knative 减少了这种新的软件开发方法所产生的开销,同时还把路由(routing)和事件(eventing)的复杂性抽象出来。
核心组件:
为了实现对serverless 的管理, knative 将整个系统划分为三个部分, 主要由三个组件来实现
构建: 通过灵活的可配置方法将源代码构建为容器;
服务: 管理应用的部署和服务支持;
事件: 用户自动完成事件的绑定和触发;
Knative 服务(kantive Serving)
knative serving 主要是用来部署serverless 应用以及为其提供服务支持.其主要特性如下:
- 快速部署Serverless 容器
- 自动缩放包括将pod缩放到0
- 支持多个网络组件来提供路由和网络编程, 例如 Ambassador、Contour、Kourier、Gloo 和 Istio。
- 支持部署快照。
Knative Serving 通过 Kubernetes 自定义资源 (CRD) 来控制serverless 应用在集群中的行为 :
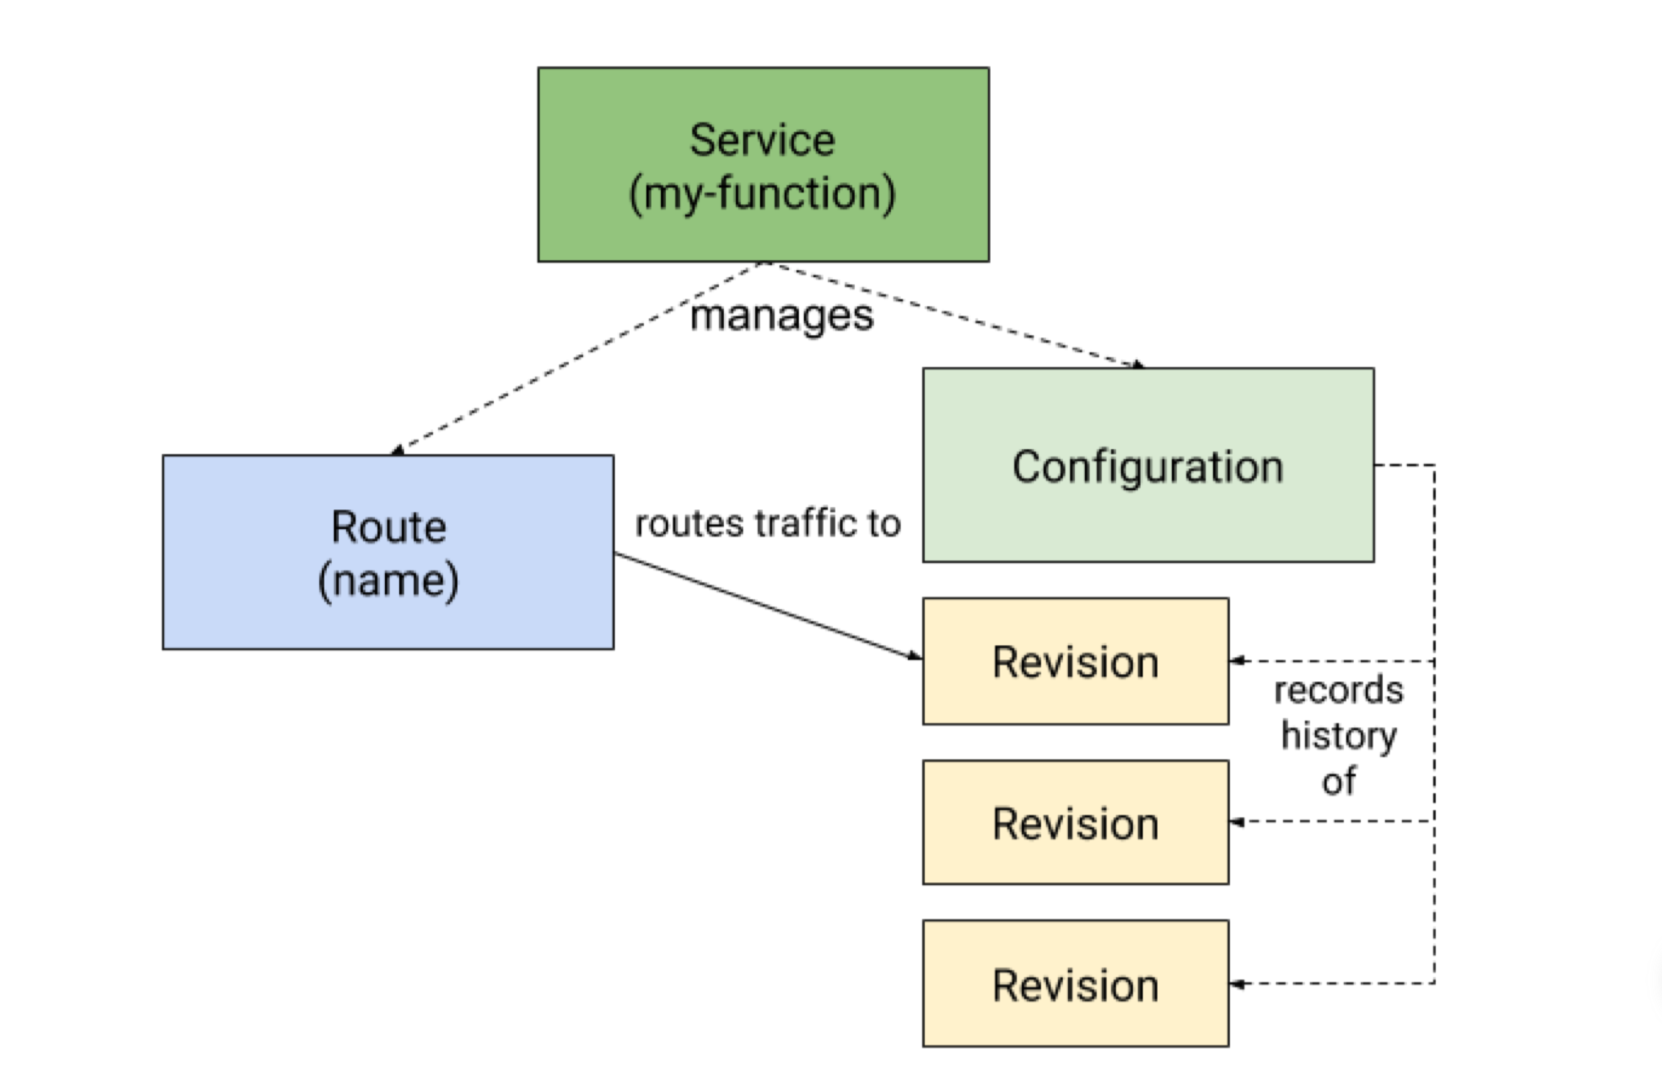
Route: route.serving.knative.dev资源将网络端点映射到一个或者多个Revision. 可以通过多种方式管理流量.包括灰度流量和重命名路由.
Configuration: configuration.serving.knative.dev 负责保持Deployment的期望状态,提供了代码和配置之间清晰的分离,并遵循应用开发的12因素.修改一次Configuration就会生成一个Revision;
Revision: revision.serving.knative.dev 该资源是对工作负载进行的每次修改的代码和配置的时间点快照. Revision是不变对象,如果有用就可以保留.
Service: service.serving.knative.dev资源自动管理工作负载的整个生命周期。负责创建Route、Configuration以及Revision资源.通过Service可以将流量路由到最新版本或者指定版本的Revision;
如果单独控制 Route 和 Configuration,那么就可以不使用Service,但是knative 推荐使用service,因为它会帮你自动管理 Route 和 Configuration.
资源关系图:
knative service 测试
一个 knative service 的 helloworld-go.yaml 如下所示:
 1apiVersion: serving.knative.dev/v1
 2kind: Service
 3metadata:
 4  name: helloworld-go
 5spec:
 6 template:
 7   metadata:
 8     labels:
 9       app: helloworld-go
10     annotations:
11       autoscaling.knative.dev/target: "10"  # 单个pod可以处理的最大并发数
12   spec:
13     containers:
14      - image: registry.cn-hangzhou.aliyuncs.com/knative-sample/helloworld-go:160e4dc8
15        ports:
16          - name: http1
17            containerPort: 8080
18        env:
19          - name: TARGET
20            value: "World"
提交yaml文件到Kubernetes集群:
1➜  test kubectl apply -f helloworld-go.yaml
2service.serving.knative.dev/helloworld-go created
查看service状态
1➜  test kubectl get service.serving.knative.dev
2NAME            URL                                        LATESTCREATED         LATESTREADY           READY   REASON
3helloworld-go   http://helloworld-go.default.example.com   helloworld-go-shphd   helloworld-go-shphd   True
提交service 之后就会创建出 route 和 configuration, 如下所示:
 1➜  test kubectl  get route helloworld-go -o yaml
 2apiVersion: serving.knative.dev/v1
 3kind: Route
 4metadata:
 5  annotations:
 6    serving.knative.dev/creator: kubernetes-admin
 7    serving.knative.dev/lastModifier: kubernetes-admin
 8  creationTimestamp: "2021-08-19T14:09:02Z"
 9  finalizers:
10  - routes.serving.knative.dev
11  generation: 1
12  labels:
13    serving.knative.dev/service: helloworld-go
14  name: helloworld-go
15  namespace: default
16  ownerReferences:
17  - apiVersion: serving.knative.dev/v1
18    blockOwnerDeletion: true
19    controller: true
20    kind: Service
21    name: helloworld-go
22    uid: d45f60a7-c588-4fb0-8072-fb07f8b4bfd9
23  resourceVersion: "299550247"
24  selfLink: /apis/serving.knative.dev/v1/namespaces/default/routes/helloworld-go
25  uid: bb5c65e1-1d4f-4cf8-82b5-792be2ee110f
26spec:
27  traffic:
28  - configurationName: helloworld-go
29    latestRevision: true
30    percent: 100
31status:
32  address:
33    url: http://helloworld-go.default.svc.cluster.local
34  conditions:
35  - lastTransitionTime: "2021-08-19T14:12:39Z"
36    status: "True"
37    type: AllTrafficAssigned
38  - lastTransitionTime: "2021-08-19T14:12:39Z"
39    message: autoTLS is not enabled
40    reason: TLSNotEnabled
41    status: "True"
42    type: CertificateProvisioned
43  - lastTransitionTime: "2021-08-19T14:12:42Z"
44    status: "True"
45    type: IngressReady
46  - lastTransitionTime: "2021-08-19T14:12:42Z"
47    status: "True"
48    type: Ready
49  observedGeneration: 1
50  traffic:
51  - latestRevision: true
52    percent: 100
53    revisionName: helloworld-go-shphd
54  url: http://helloworld-go.default.example.com
 1➜  test kubectl get config helloworld-go  -o yaml
 2apiVersion: serving.knative.dev/v1
 3kind: Configuration
 4metadata:
 5  annotations:
 6    serving.knative.dev/creator: kubernetes-admin
 7    serving.knative.dev/lastModifier: kubernetes-admin
 8    serving.knative.dev/routes: helloworld-go
 9  creationTimestamp: "2021-08-19T14:09:02Z"
10  generation: 3
11  labels:
12    serving.knative.dev/route: helloworld-go
13    serving.knative.dev/service: helloworld-go
14  name: helloworld-go
15  namespace: default
16  ownerReferences:
17  - apiVersion: serving.knative.dev/v1
18    blockOwnerDeletion: true
19    controller: true
20    kind: Service
21    name: helloworld-go
22    uid: d45f60a7-c588-4fb0-8072-fb07f8b4bfd9
23  resourceVersion: "299550167"
24  selfLink: /apis/serving.knative.dev/v1/namespaces/default/configurations/helloworld-go
25  uid: 7fe6974b-1eb6-475d-9a13-f675e2849c4b
26spec:
27  template:
28    metadata:
29      annotations:
30        autoscaling.knative.dev/target: "10"
31      creationTimestamp: null
32      labels:
33        app: helloworld-go
34    spec:
35      containerConcurrency: 0
36      containers:
37      - env:
38        - name: TARGET
39          value: World
40        image: registry.cn-hangzhou.aliyuncs.com/knative-sample/helloworld-go:160e4dc8
41        name: user-container
42        ports:
43        - containerPort: 8080
44          name: http1
45        readinessProbe:
46          successThreshold: 1
47          tcpSocket:
48            port: 0
49        resources: {}
50      timeoutSeconds: 300
51status:
52  conditions:
53  - lastTransitionTime: "2021-08-19T14:12:39Z"
54    status: "True"
55    type: Ready
56  latestCreatedRevisionName: helloworld-go-shphd
57  latestReadyRevisionName: helloworld-go-shphd
58  observedGeneration: 3
创建Configuration 之后,就会创建出相应的Deployment、ReplicaSet 和 Pod。
1➜  test kubectl get deployment -o name | grep helloworld
2deployment.apps/helloworld-go-shphd-deployment
3➜  test kubectl get replicasets -o name | grep helloworld
4replicaset.apps/helloworld-go-shphd-deployment-776b6c5578
5➜  test kubectl get pod | grep helloworld
6helloworld-go-shphd-deployment-776b6c5578-r4gpk          2/2     Running            0          50s
可以看到pod 已经创建成功, 我们该如何访问helloworld的服务呢?这正是 Route 的用武之地。
Knative 中的 Route 提供了一种将流量路由到正在运行的代码的机制。它将一个命名的,HTTP 可寻址端点映射到一个或者多个 Revision。Configuration 本身并不定义 Route。
在上面的Route定义中 100% 流量发送到名称为helloworld-go的 Configuration 最新就绪的Revision ,即 latestReadyRevisionName: helloworld-go-shphd;
那么到底如何进行访问服务呢?
首先看一下流量转发路径:
 1[root@test ~]# kubectl get svc istio-ingressgateway -n istio-system
 2NAME                   TYPE       CLUSTER-IP      EXTERNAL-IP   PORT(S)                                                                      AGE
 3istio-ingressgateway   NodePort   10.99.173.150   <none>        15021:31685/TCP,80:31376/TCP,443:30994/TCP,15012:31651/TCP,15443:30172/TCP   3d13h
 4
 5# Gateway 是通过 VirtualService 来进行流量转发的,这就要求访问者要知道目标服务的名字才行 ( 域名 ),所以要先获取helloworld-go的域名
 6[root@test ~]# kubectl get route helloworld-go
 7NAME            URL                                        READY   REASON
 8helloworld-go   http://helloworld-go.default.example.com   True
 9
10# 已经拿到.IP.地址和.Hostname,可以通过.curl.直接发起请求:
11[root@test ~]# curl -H "Host:  helloworld-go.default.example.com" http://10.99.173.150
12Hello World!
如何进行扩缩容?
主要依靠两个组件 Autoscaler(自动伸缩器)和 Activator(激活器), 具体如下所示:
Autoscaler 收集打到 Revision 并发请求数量的有关信息。为了做到这一点,它在 Revision Pod 内运行一个称之为queue-proxy 的容器,该 Pod 中也运行用户提供的 (user-provided) 镜像。 queue-proxy 检测该 Revision 上观察到的并发量,然后它每隔一秒将此数据发送到 Autoscaler。Autoscaler 每两秒对这些指标进行评估。基于评估的结果,它增加或者减少 Revision 部署的规模。 Autoscaler 也负责缩容至零。Revision 处于 Active (激活) 状态才接受请求。当一个 Revision 停止接受请求时, Autoscaler 将其置为 Reserve (待命) 状态,条件是每 Pod 平均并发必须持续 30 秒保持为 0 (这是默认设置,但可以配置)。 处于 Reserve 状态下,一个 Revision 底层部署缩容至零并且所有到它的流量均路由至 Activator。Activator 是一个共享组件,其捕获所有到待命 Revisios 的流量。当它收到一个到某一待命 Revision 的请求后,它转变 Revision 状态至Active。然后代理请求至合适的 Pods。
参考
《knative 云原生应用开发指南》
Knative Serving